

Hello everyone.
Welcome to the first Blog Hop for 2017. Our members had a choice for this month – a Valentine theme or our favourite product from the new Occasions catalogue/Sale-A-Bration brochure.
It turns out that nearly every one of my customers chose the Hey Chick stamp set as one of their free items from the SAB brochure. As soon as I saw the brochure it was the stamp set I immediately zeroed in on. I don’t live on a farm but for whatever reason I love chickens. My best buddy in Washington State has real chickens and I enjoy visiting
with them when I go down. I’m also interested in seeing the varying
colours of eggs they produce. Not just white and not just brown, but
shades of blue, pink and yellow. Maybe my chicken interest stems from my love of owls and the collection I had in my early twenties. I now have a collection of chickens in my kitchen and I share them with you here.
 |
| Tiny glass roosters sitting on my kitchen window sill. |
 |
| One of my clients was happy to trade her rooster light for a couple of stamp sets. He sits on my dining room hutch. |
 |
| This is my chicken/rooster collection on my kitchen floor. The black & white rooster on the far left is my latest addition – a Christmas present from my husband. |
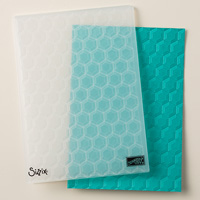
So, as thank you notes to drop into my client’s recent orders, I used the Hey Chick stamp set (p. 17 of the SAB brochure) and the new Hexagon embossing folder (p. 47 of the Occasions catalogue). All of the cards measure 4 x 4 inches save for the last two which measure 3 x 3 inches. So, for the envelopes, I made my own using the envelope punch board.

I embossed the front of this card with the embossing folder and used it again to create the chicken wire texture on the Whisper White panel. To ink the folder, open it up and drag the Basic Gray ink pad over the side that has the Sizzix and Stampin’ Up! logos. Then gently place the Whisper White piece on top of that inked surface and then I place a piece of scrap copy paper on top of that and gently rub to pick up the texture.

For this card, I inked up the embossing folder as described above then placed the front of the card base on top, closed the folder and ran it through the big shot. Here’s a photo to show you the placement of the card base.


This is a Basic Black card base and I inked up the Hexagon folder with the Whisper White craft ink. Be careful not to smudge the ink as it stays wet for quite a while.

Have you noticed a bit of a layering theme going on. These chickens are quirky so I felt the papers had to follow suit.

I also used washi tape on some of the cards to add some more texture and interest. I am loving it.

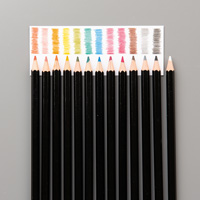
For the colouring, I mostly used the new Watercolor Pencils (p.24 of the Occasions catalogue) and an Aqua Painter (p.18 of the Annual catalogue). Here’s a tip for you. You don’t need to colour over the entire image with the pencils. Just outline the image and colour over any of the dark lines then use the Aqua Painter to pull the colour into the white areas.
I hope you have enjoyed this post. All of the supplies used are listed below and link directly to my online store. Be sure the use the January Host Code Q2RNCBA6 when ordering to have your name entered into this month’s prize draw.
Please have a look at all the blog entries for this month by following the links below. Any questions, be sure to contact me. Happy stamping!


 Subscribe!
So much fun!!! They are great Erica! TYFS.