
It’s another Seashore Stampers Blog Hop with my fellow island demonstrators. This month’s theme is weddings.

Although modern weddings are very creative in their design and floral choices, I still appreciate the traditional rose for wedding bouquets. My first wedding bouquet consisted of large and small yellow roses. They were a favourite of my grandmother’s and sadly she had already passed away so it was a bit of a tribute to her. For my second, and thankfully, a happy marriage of over 30 years, I chose pink roses.
These memories formed the inspiration for this card – a rose theme using the stamp set bundle called All Things Fabulous, a three-step stamping set. If you love roses, you will want to add this set to your collection.
There are two styles of roses in this set, each having three stamps that you use to build the flowers using shades of the same colour or three different coordinating colours. To start, I decided to play with stamping these images using the ink pads I have. I got a little carried away and focused on one of the roses for my practice and will have to have another go using the other rose.

You can use three ink pads in the same hue such as Flirty Flamingo, Calypso Coral and Poppy Parade or you can use two colours and use the stamp off technique to create two shades of the same colour. You can choose to use all three of the stamps to build the rose or use two of the stamps as I did in this card.

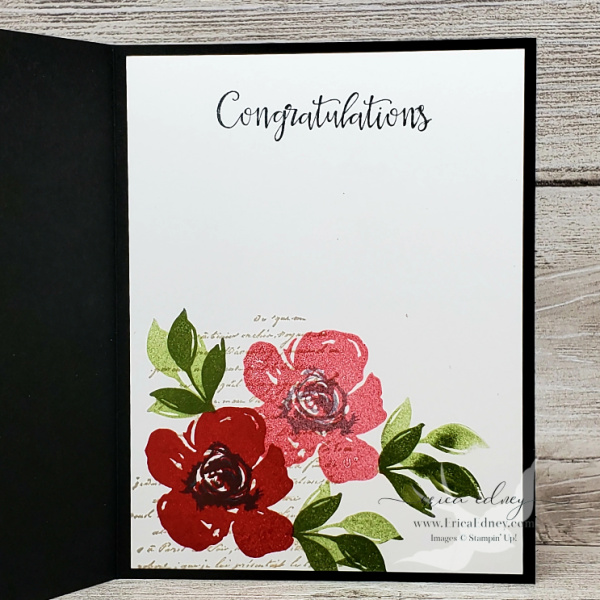
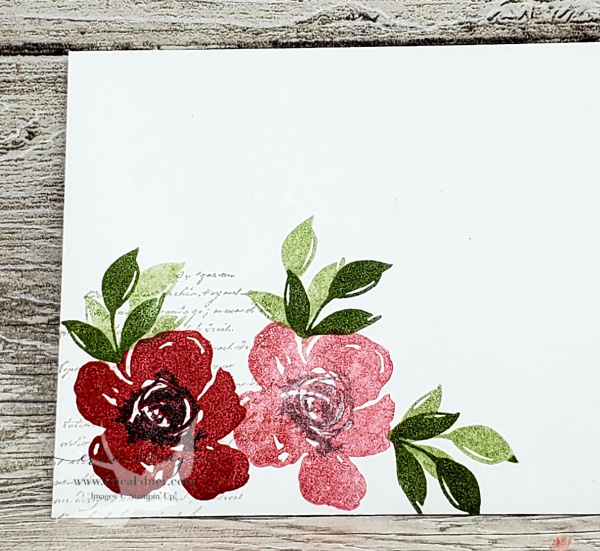
Second generation stamping is a technique used to create a lighter shade of the same colour. Ink the stamp, stamp it and immediately stamp to create another image. I inked up the largest stamp in Real Red and stamped it on the Basic White, then immediately stamped it again to get a slightly lighter shade of red for the second rose. I then used the smallest stamp for the centre of the rose and stamped in Memento Tuxedo Black ink and then stamped it again on the lighter rose. For the leaves, I inked up in Mossy Meadow, stamped and then stamped again to get a lighter shade. I did the same for the tiny buds.
The other stamp set used is Very Versailles, particularly for the antiqued script stamp and inked it using Sahara Sand.
To bring more tradition to the card, I used our vellum cardstock and cut a lace border from the coordinating Fabulous Florals die set.

I used the Wonderful Gems to add a bit of bling, as I love to do. These were introduced in last year’s Aug-Dec 2020 Mini Catalogue and happily are returning in the upcoming holiday mini.
A couple more photos to show you the inside of the card and the envelope.
Cutting & Scoring Measurements
- Basic Black, 5-1/2″ x 8-1/2″, scored at 4-1/4″
- Basic White, 4″ x 5-1/4″, two pieces
- a small piece of Vellum to fit the die
Supplies Used
If you wish to purchase any of the items used in this project, click here and edit the shopping cart as you need.
Thank you for stopping by my blog. Now hop along to the others and see what they have designed for wedding cards.


Thank you for joining us this month and stay tuned for next month’s theme, a 3D project.

 Subscribe!
Absolutely gorgeous project!